
Tags
#bakeoftheweek, #CookBlogShare, baking, Bucks County cookbook, candymaking, chocolate easter egg recipe, coconut easter egg candy recipe, coconut easter eggs, coconut-chocolate candy eggs, cookbook announcement, cookbook writing, Easter candy, Easter egg candy, heritage recipes, homemade Mounds bars, how to make your own chocolate Easter Eggs, Mary At The Farm, Pennsylvania, self-publishing a cookbook, Simply Eggcellent, Tea Time Treats, The Biscuit Barrel, We Should Cocoa
 Something unusual has been going in my kitchen for the last several months. I’ll give you a few of the symptoms, and then you have three guesses to tell me what it is.
- I note the start and finishing times of every step of a recipe, even simple things like sweating onions.
- I compulsively double-check my grocery lists at the beginning of the week to make sure that I have the exact amount written down for each item.
- I measure and weigh all my ingredients.
- Trying to find an open spot in my freezer is beginning to resemble solving a jigsaw puzzle, such a muddle of half batches of muffins, odd bags of cookies, containers of stock and gravy, and various loaves of bread it has become. I am churning out more than my family can possibly consume, and a repetitive motif occasionally shows up: for example, that cake that we ate for dessert three weeks in a row.
Writing a cookbook, you say? How clever of you to guess.
 Yes, I am writing a cookbook. The first of many I hope. It is a collection of heritage recipes from Bucks County, Pennsylvania, which I have culled from a collection of old community cookbooks, updated, and made usable for the modern cook—oven temperatures and pan sizes, anyone? The book will have approximately ninety recipes, each with a full-colour photograph, as well as a few tidbits about historical Bucks County restaurants. (Since staring work on the book, I have learned that this area is simply teeming with interesting places to eat. Last week, I had lunch at an old stagecoach inn that was the meeting place for the organizers of Fries’s Rebellion in 1799.)
 I have wanted to be a cookbook author for some time. When I headed up to Toronto for Chef Training School, writing cookbooks was my ultimate goal—not, like most of my fellow students, owning a restaurant or becoming head chef at a ritzy hotel. I have, in round figures, thirty cookbooks that I want to write. And that is rounding down, not up.
 Most of these ideas involve researching cuisines in other countries though, so I figured that I would have to wait a few more years before I could actually start working on any of them. But writing cookbooks was the plan. That was why I went to Chef School, why I studied journalism, why I took photography classes.

 And then I read Mary At the Farm. Do you remember the Quaker Bonnet Biscuits I wrote about last year? The recipe originally came from this 1915 Bucks County chronicle, which is about a hundred pages of story and two hundred of recipes. Those recipes intrigued me so much that I immediately wanted to learn more about the cultural heritage of Bucks County. So I bought up all the old, local cookbooks I could find and read them from cover to cover. And cooked from them (you’ve seen some of the recipes already, here and here and here).
 They impressed me. Certainly they were hard to cook from, and recreating the recipes included a good bit of guesswork, but the food was delicious. And I thought, it’s a shame that these gems of recipes have to languish in the pages of old books. Why shouldn’t I update them, re-write them to be intelligible to the modern cook, and compile the best ones in a new cookbook?
 And why should I wait until I’m famous enough to attract a book agent and a contract with a big publishing house? Thanks to my experience with self-publishing my novel, I am perfectly happy to publish it myself. In the first place, the book will reach the public a lot sooner. Secondly, it means that I can do a full-page photograph of every single recipe without being told that it costs too much. I love cookbooks like that, and I want mine to be one.
 I admit, self-publishing is a lot of work. “What do you do?” “Me? Oh, I’m a writer, recipe tester, photographer, designer, publisher, proofreader, marketing director, and publicist.” However, it is also heaps of fun. Someday I will have an agent and contracts, but for now, I’m going to enjoy my chance to write and photograph a cookbook exactly the way I envision it.
 The cookbook’s title isn’t firmly settled yet—choosing a title is the hardest part of writing a book in my opinion: I had an awful time settling on the one for my novel—but I’ll let you know as soon as I decide. If all goes according to plan, the cookbook will be finished and available for sale by mid-summer. Update, June 6th, 2014: Potato Pie and Cherry Pickle–that’s the title I decided on–is now available for purchase! If you like this recipe, you might also enjoy the rest of the book. You can take a peek inside on its Amazon page.
 I’m telling you about it now, because the next two months are going to be jammed with recipe testing, and I might not be posting here as much as I would like. I’ve tried to schedule time for the blog, but you know, things happen. So if I disappear entirely for the next two months—well, don’t say I didn’t warn you.
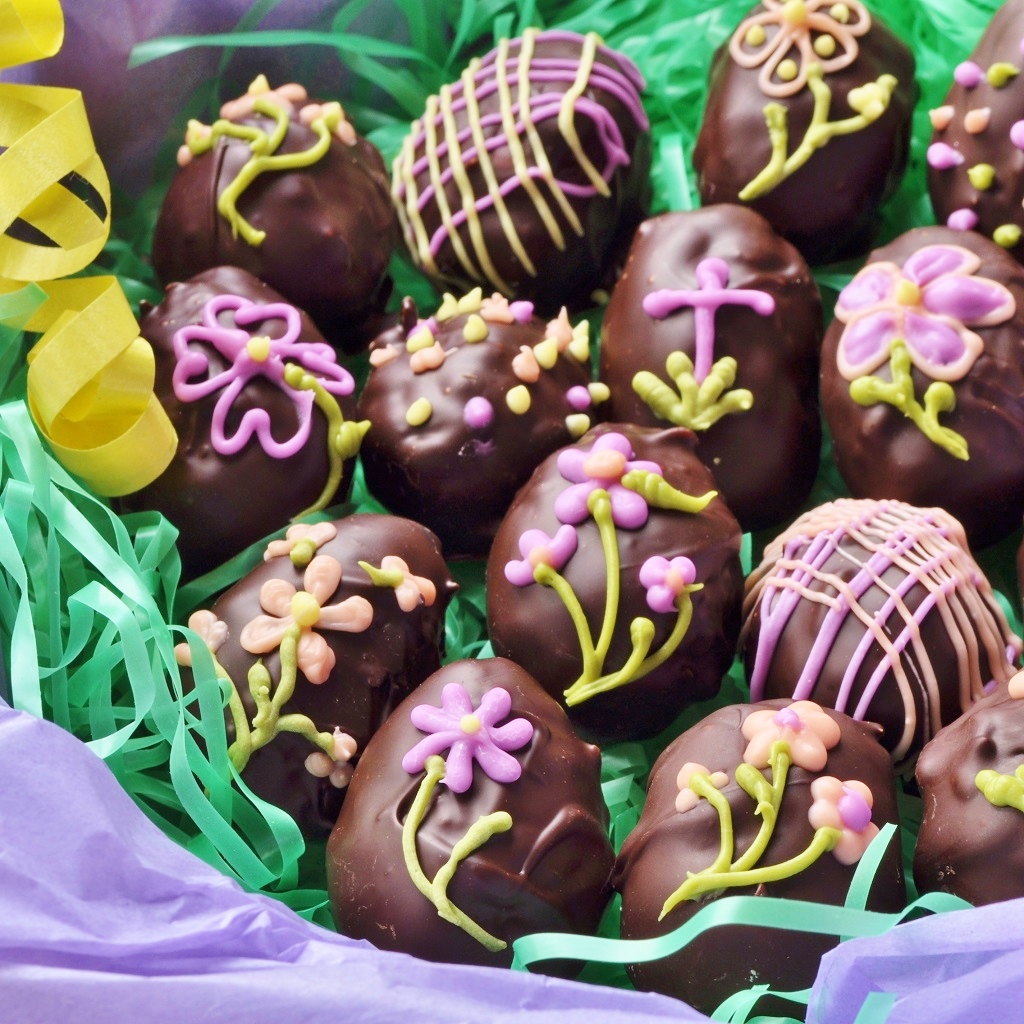
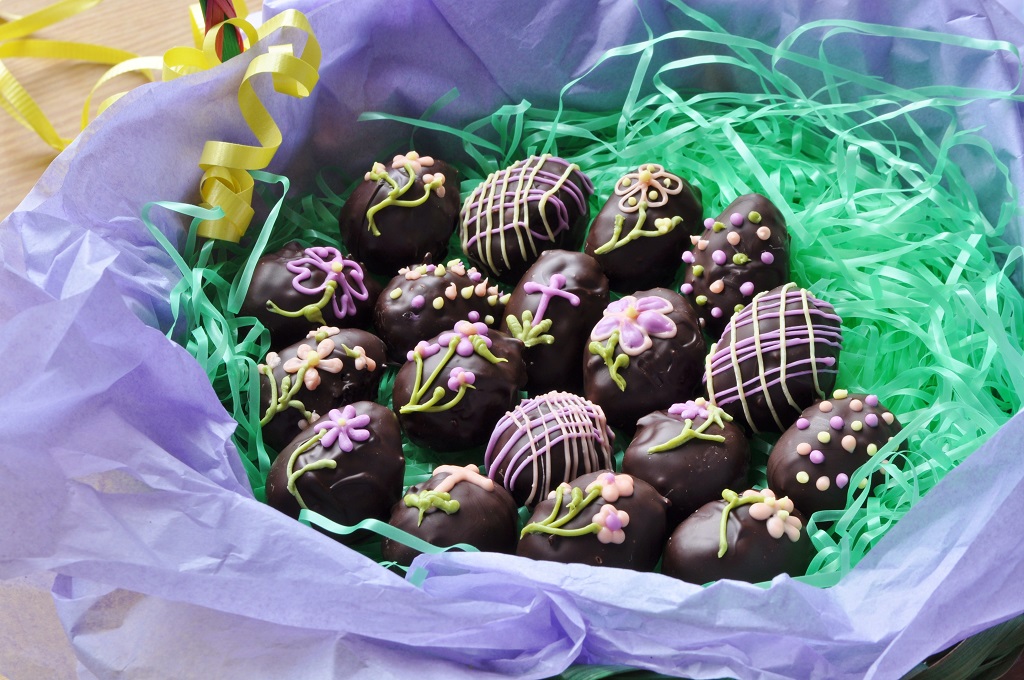
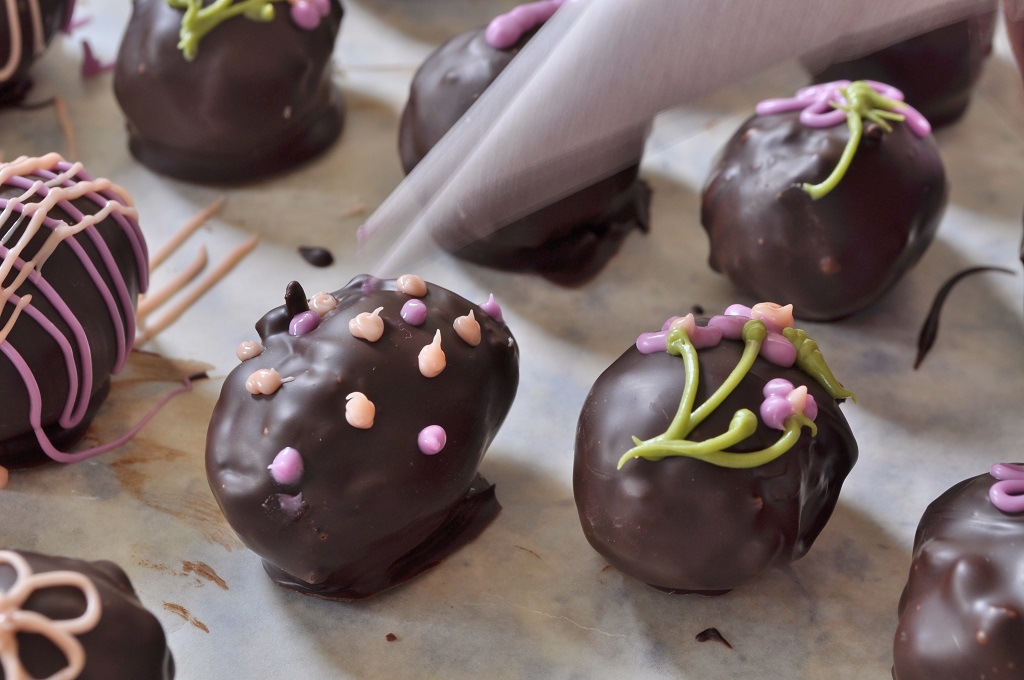
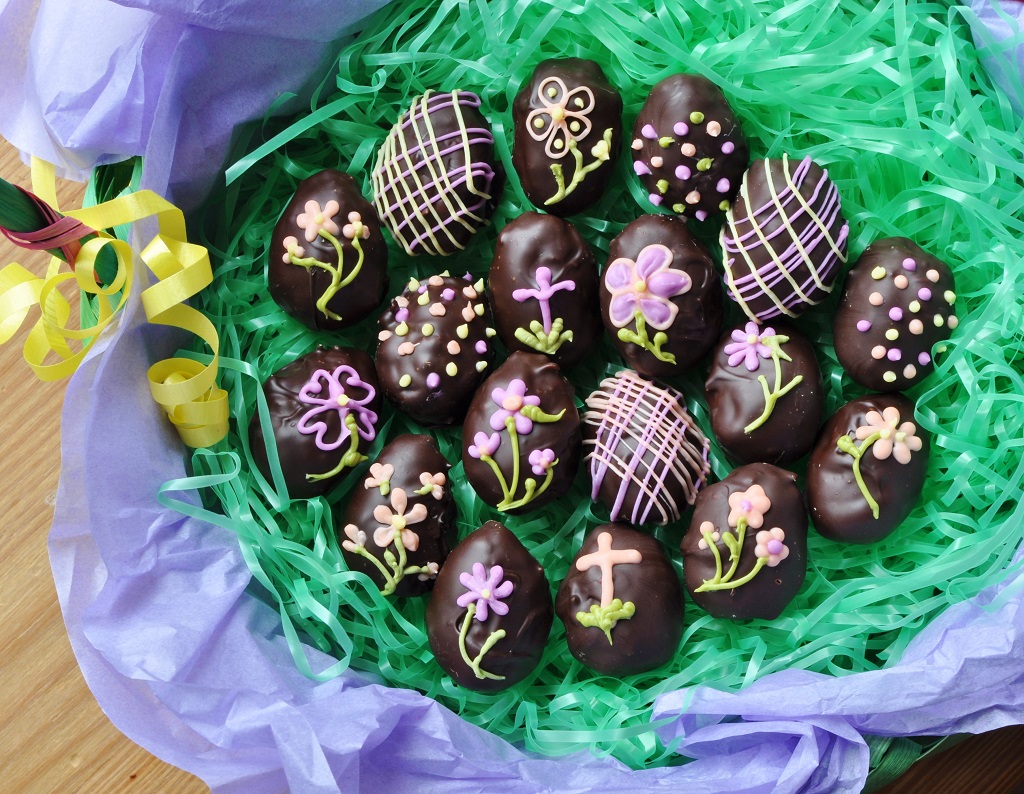
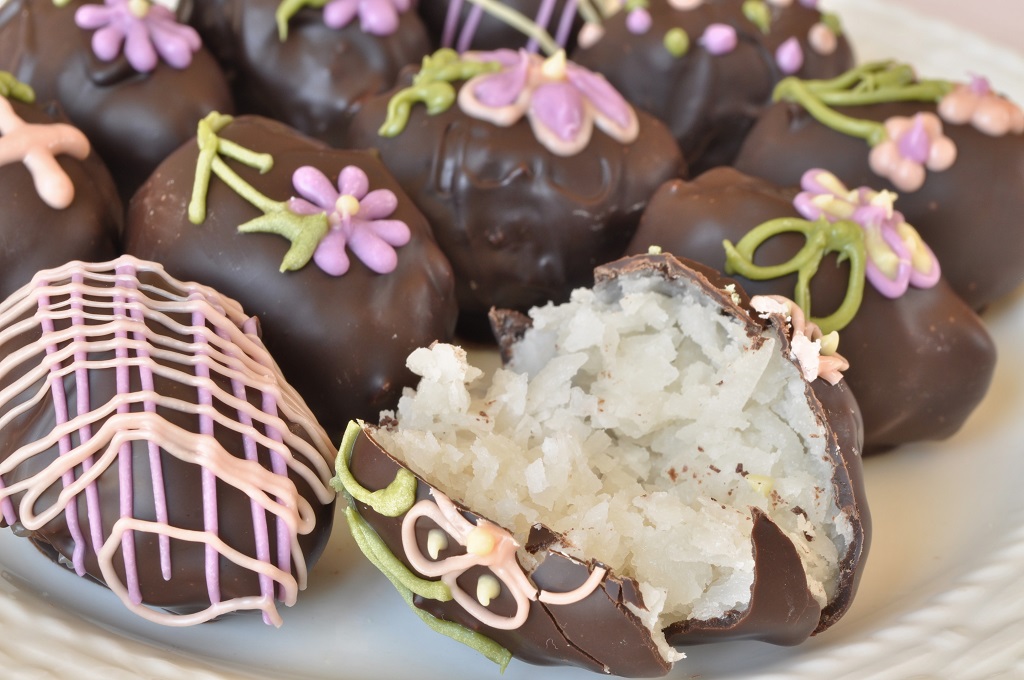 It’s only fitting that I give you a recipe from the cookbook today: lovely little nuggets of chocolate-drenched coconut. The old books call them Easter egg candy. The candies taste like glorified Mounds bars, with a moist coconut filling encased in a crisp, glossy shell of tempered chocolate.
![]() And since Easter candy means springtime, I’m linking the recipe up with The Biscuit Barrel challenge organized by Laura of I’d Much Rather Bake Than . . . She picked springtime as the theme, and baking for the challenge has been a solace for me, as the weather here in Pennsylvania persists in pretending that it is still winter.
And since Easter candy means springtime, I’m linking the recipe up with The Biscuit Barrel challenge organized by Laura of I’d Much Rather Bake Than . . . She picked springtime as the theme, and baking for the challenge has been a solace for me, as the weather here in Pennsylvania persists in pretending that it is still winter.
 Laura is also hosting We Should Cocoa this month, the lovely blogging event headed by Choclette of Chocolate Log Blog. With another excellent choice, Laura selected coconut as the ingredient to pair with chocolate, and I immediately thought of these candies.
 Update: April 1st, 2015
So, Easter has come round again, and I’m linking this recipe up again with a number of challenges. Because it’s too good not to share it every year!
![]() First up, my own Candy-themed Biscuit Barrel, which I am guest-hosting for Laura of I’d Much Rather Bake Than . . .
First up, my own Candy-themed Biscuit Barrel, which I am guest-hosting for Laura of I’d Much Rather Bake Than . . .
 Then I am also linking up with Tea Time Treats, the wonderful challenge run by Karen of Lavender and Lovage and Janie of The Hedgecombers. Karen is hosting this month and the theme is chocolate.
![]() I am going to stretch things a bit and share these with Belleau Kitchen’s Simply Eggcellent challenge as well, where the theme is also chocolate. Now, my candy only uses the egg whites, I admit . . but I remember that being quite sensational in itself, because it was the only recipe in my cookbook that used raw egg and so had to have that little disclaimer typed at the bottom of the page. And after all, they technically are eggs themselves . . .
I am going to stretch things a bit and share these with Belleau Kitchen’s Simply Eggcellent challenge as well, where the theme is also chocolate. Now, my candy only uses the egg whites, I admit . . but I remember that being quite sensational in itself, because it was the only recipe in my cookbook that used raw egg and so had to have that little disclaimer typed at the bottom of the page. And after all, they technically are eggs themselves . . .

 Finally I am joining in Supergolden Bakes’ #CookBlogShare and Casa Costello’s #BakeoftheWeek as usual–I love those two ladies for providing us with weekly challenges!
 Coconut Easter Eggs
Ingredients:
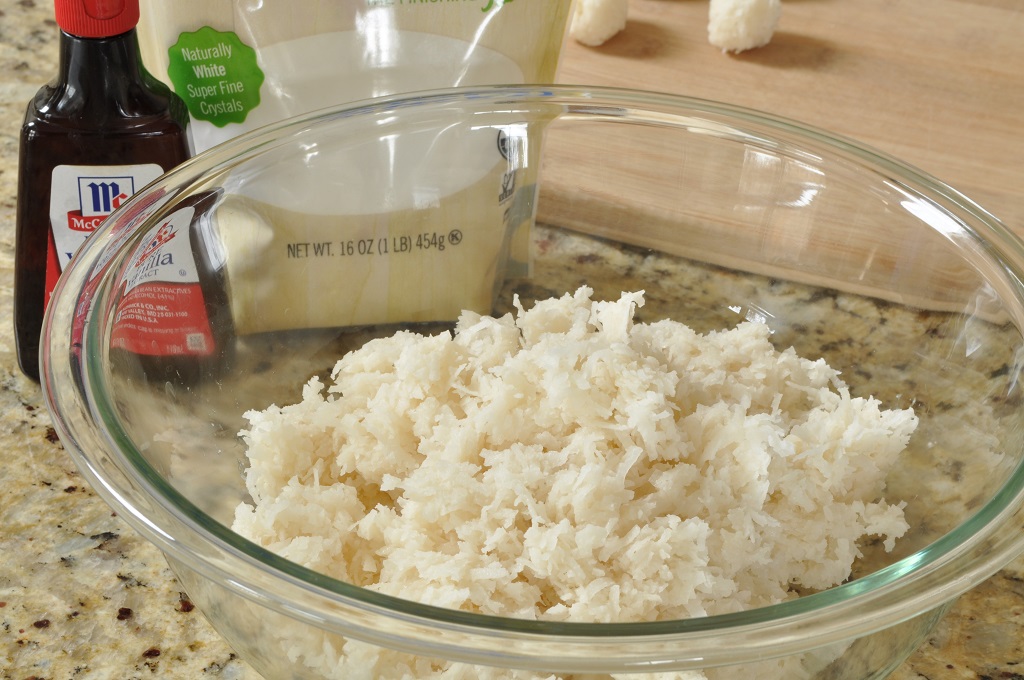
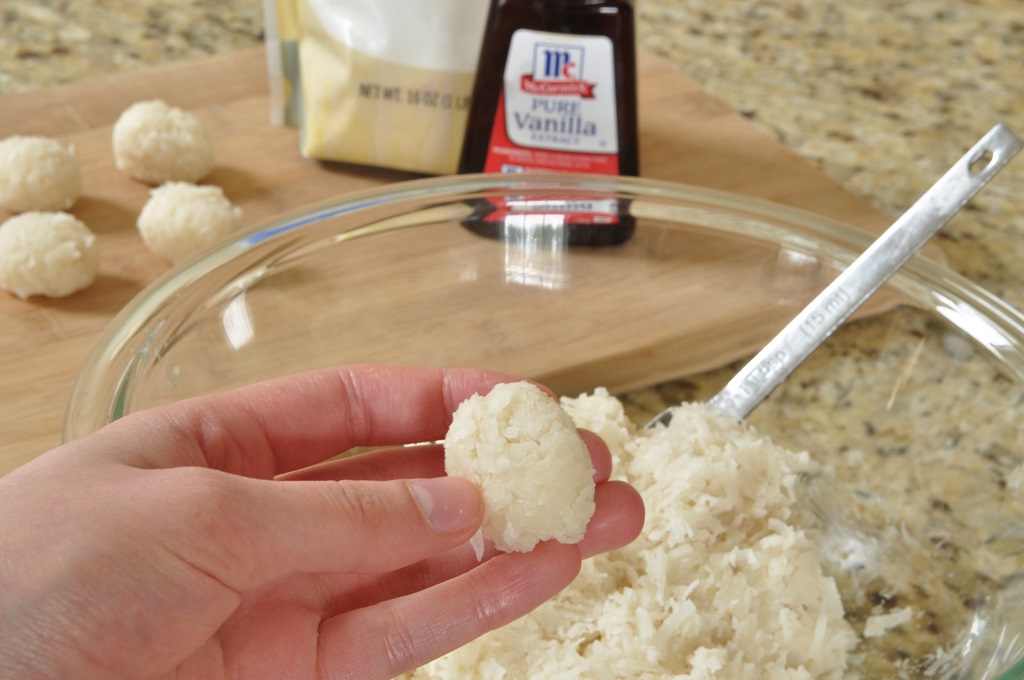
1 14-oz. bag (400 g.) sweetened, shredded coconut 1 ¼ cups (150 g.) confectioners’ sugar, sifted 1 tablespoon (15 ml) whole milk 1 egg white* ½ teaspoon vanilla 1 lb. (454 g.) bittersweet couverture chocolate Melted white chocolate chips and oil-based food colourings for decoratingTechnique:
- Toss the coconut and confectioners’ sugar together in a large bowl.
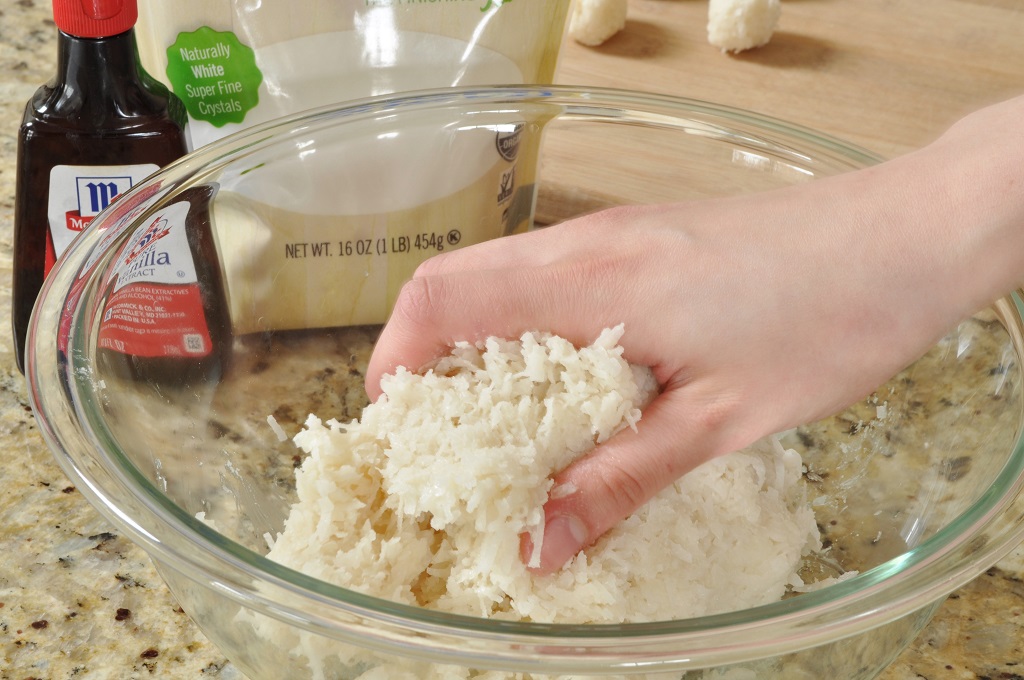
- Add the milk, egg white, and vanilla. Knead everything together until the mixture forms a smooth, cohesive mass, 4 to 5 minutes.
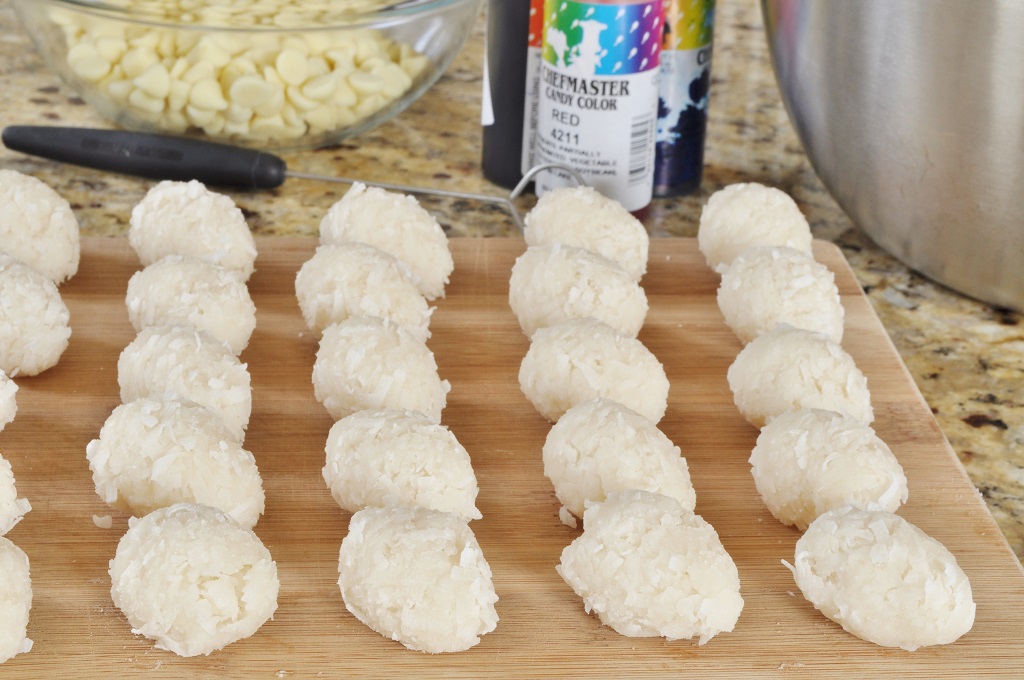
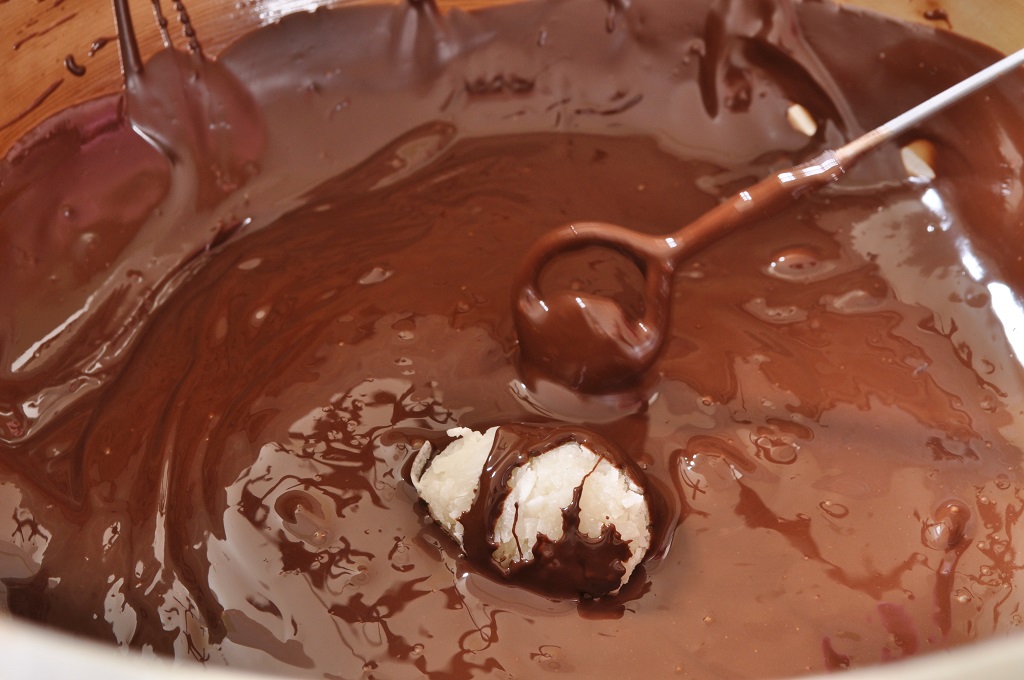
- Scoop out tablespoons of the coconut filling and roll them into egg-shaped ovals between the palms of your hands.
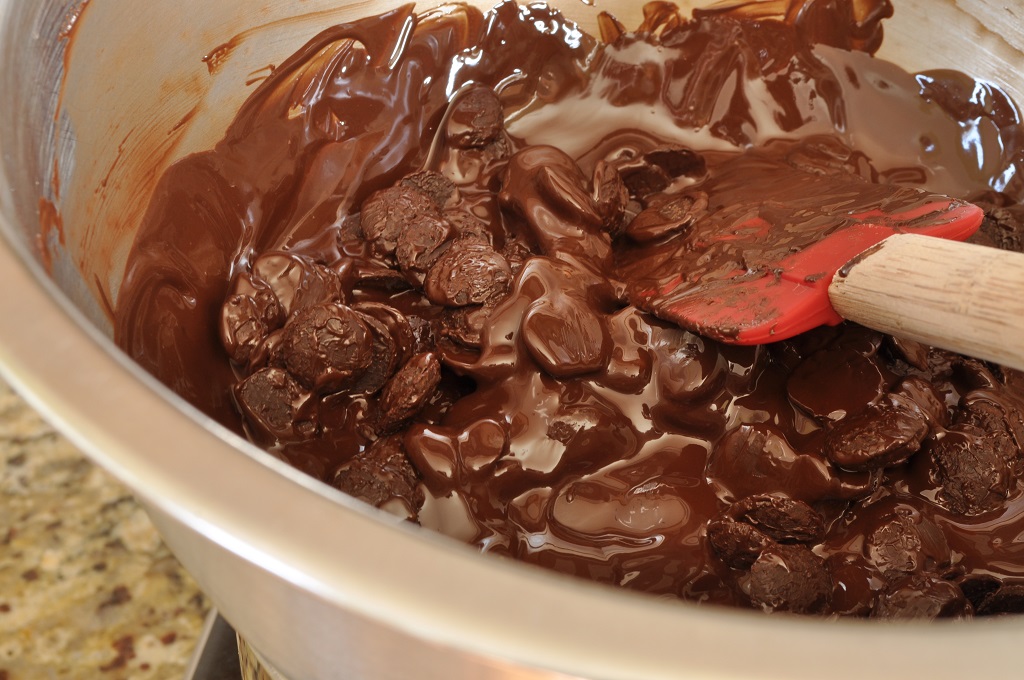
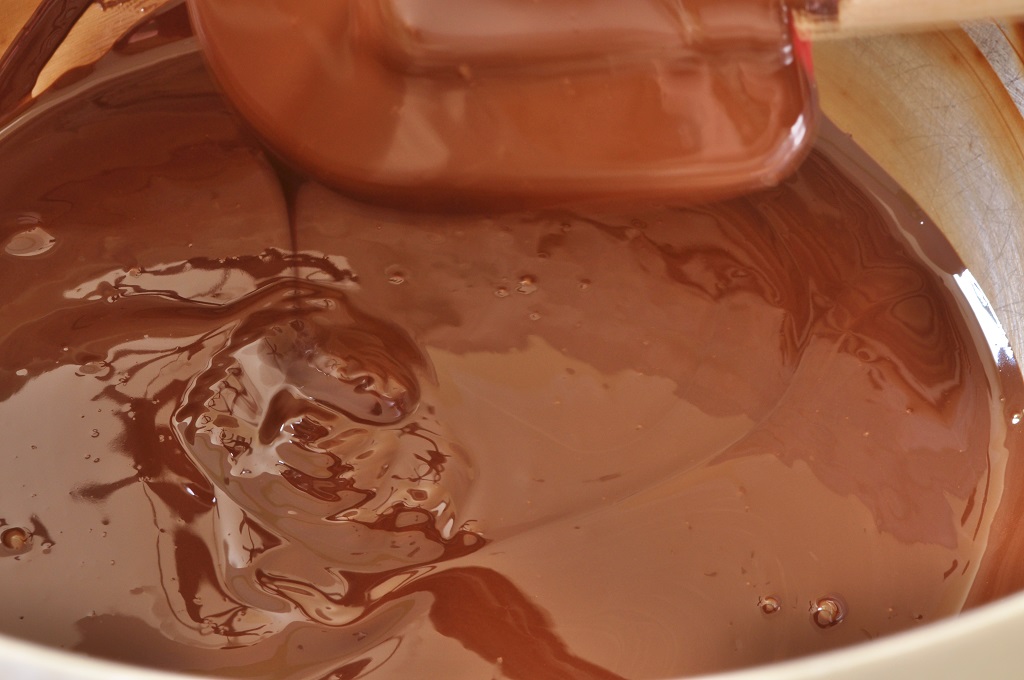
- While you are shaping the eggs, you can also start the process of tempering the chocolate to dip them in. Bring a few inches of water to a simmer in a saucepan. Choose a metal bowl that will balance on the saucepan without the bottom of it touching the water in the pot, and place the chocolate in it. Set the bowl over the steam and let the chocolate melt, stirring it occasionally.
- Chocolate is tempered in order to convert as much of the crystal structure of the cocoa butter into the Beta 6 form as possible. Cocoa butter crystals are polymorphic, which means that they can bond in several different ways, and the Beta 6 form provides the best gloss and snap once the chocolate hardens. In order to encourage the formation of the Beta 6 bonds, the chocolate is taken through a melting process of specific temperatures. This all sounds very complicated and scientific, but tempering chocolate is actually quite simple.
- After the chocolate has melted, allow it to continue to heat until it reaches a temperature between 125°F and 130°F. In this temperature range, if you dab a little of the chocolate on the inside of your wrist or on the skin directly below your lip it will feel hot, but won’t burn.
- Remove the bowl from the steam and dry off the bottom of it with a dry towel. You do not want to get any water mixed in with the chocolate, as even a few drops will cause the chocolate to seize up and harden. Keep the pot of water on the stove at a low simmer.
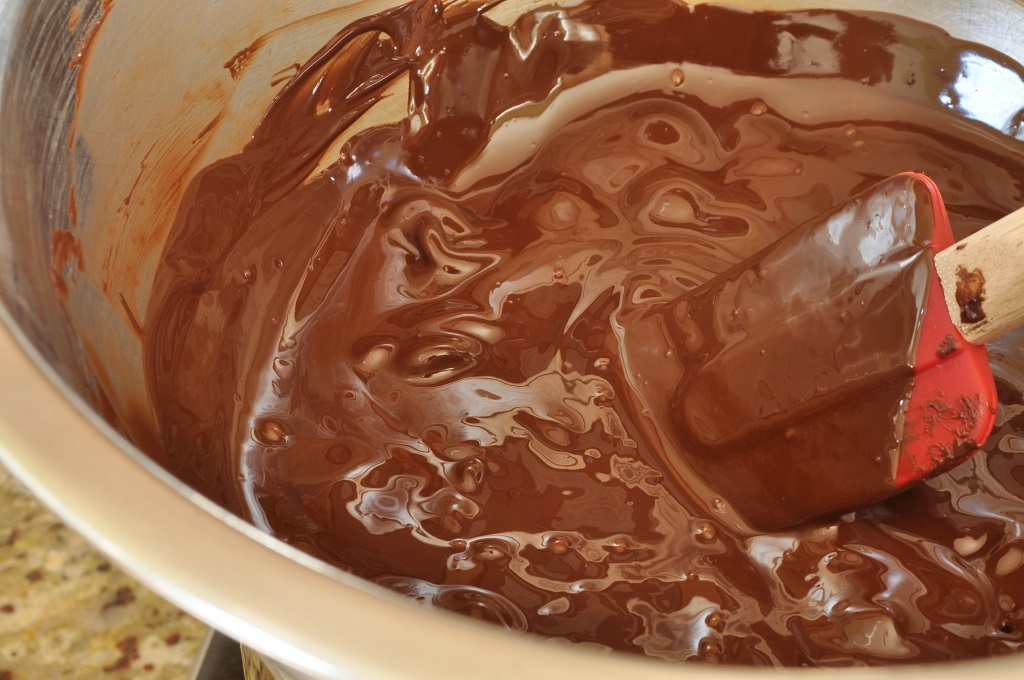
- Allow the chocolate to cool, stirring it occasionally, until its temperature is just below 82°F. This is the temperature where the Beta 6 bonds form. Once the chocolate has cooled to this temperature, it is in temper. It will feel cool and the consistency will have thickened slightly. To test to see whether the chocolate is properly in temper, take a small strip of parchment paper and dip it into the chocolate. Drag the strip against the side of the bowl to remove all but a thin coating of the chocolate. Set the strip aside. In a few minutes, the chocolate should glaze over, and by the end of 5 minutes, it should have hardened completely. If it does not harden by the end of the 5 minutes, continue to cool the chocolate, stirring occasionally, for a few minutes, and then test again.
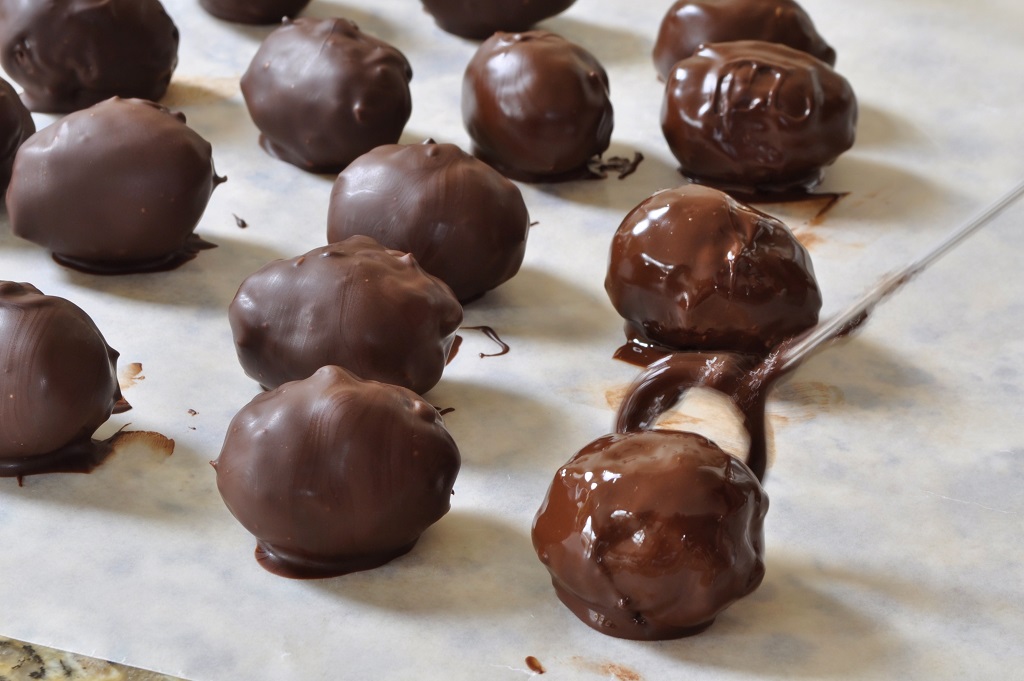
- Once the chocolate is in temper, use a loop dipper or a fork to dip each shaped egg into the chocolate, coating it completely. Tap the bottom of the fork against the surface of the chocolate to remove excess coating and then transfer the egg to a piece of wax paper to allow the chocolate to set. Repeat until all the eggs have been coated with chocolate.
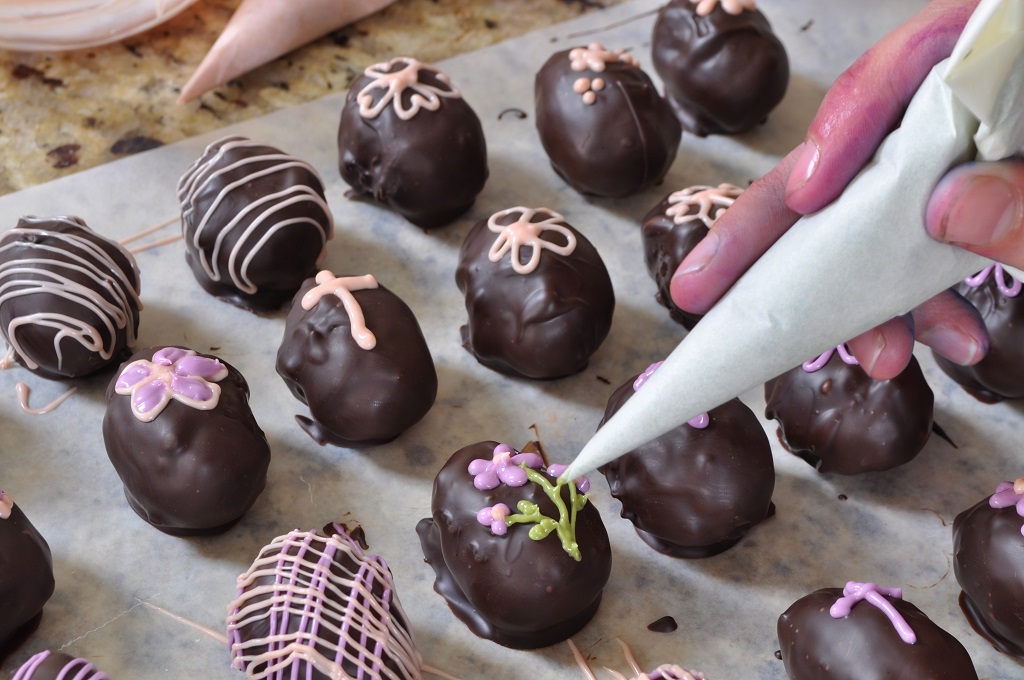
- Once the coating on all the eggs is set, put small amounts of melted white chocolate into bowls and tint them with a few drops of food colouring. Make sure to use appropriate oil-based colourings, as water-based colourings will make the chocolate seize up (see step 7).
- Spoon some of one of the coloured chocolates into a paper cone (or you can use a Ziplock bag with the very tip of a corner snipped off) and pipe dots, stripes, flowers, or whatever else suits your fancy onto the surface of the eggs. Repeat with the remaining colours.
- Once the piping has hardened, arrange the finished eggs in a single layer in an airtight container and store in a cool place.
Yield: 3 dozen chocolate eggs
* Note: The egg white in the filling is uncooked, so if you are worried about that, you can use pasteurized egg whites instead.

Oh how very exciting and very well done you. You’re training certainly shows in your blog. You always create interesting posts and your photographs are excellent. Good Luck.
Thanks for entering these into WSC. They sound just like our bounty bars, which are one of our favourites. Only one entry strictly allowed, but I expect Laura will be lenient, especially as you thought of these straight away 😉
Thank you for your encouraging words, Choclette. I remember having Bounty bars when I lived in England as a kid; they taste just like our Mounds Bars. Sorry about submitting two entries–I never can remember which challenges allow more than one and which ones don’t!
Confession time for me – I completely forgot about the one entry only rule which is rather bad of me as this months host =S I think it’s because I get so enthusiastic about these challenges! Wow, wow, wow though, both for your amazing news and gorgeous coconut treats. The eggs are so pretty and well decorated and you deserve every success in your book =)
Thank you, Laura. And it’s nice to know that I’m not the only one who forgot the one entry rule! What can I say, chocolate and coconut, it’s so delicious that I definitely was enthusiastic about this challenge in particular.
Alexandra, Now this is a recipe I’m going to have to try for Easter. I simply love chocolate and coconut and this looks absolutely yummy. I’m familiar with Mounds, Bounty, and pretty much any commercial combination of these ingredients so it will be interesting to compare. Thanks!
I hope you enjoy them!
These are so unusual and so pretty. Do sound like Bounty bars but I bet they taste much better?
Thank you, Lesley. And yes, they do taste better–especially since you can use a high-quality bittersweet couverture for the coating instead of the insipid chocolate used in mainstream chocolate bars!
Your cookbook sounds really interesting – I am fascinated by old recipes. I also find they can be challenging because they tend to assume some prior knowledge and skip numerous steps, which is difficult if you are making something unfamiliar. It is a great idea to take those recipes and re-write them for a modern audience. Your coconut eggs look so pretty – and delicious!
Thank you! I love old recipes and find them so intriguing. But cooking from old books can certainly be difficult for the modern cook, which is the main reason why I decided to update some of the old, local recipes and compile a new cookbook of them.
Those eggs are lovely! And congratulations on your cookbook!
Thank you, Helen.
Oh I love these. You really are a proper professional baker. These eggs are truly inspiring, so pretty and perfectly made. Beautiful!
Thank you for your kind words, Alida. Inspiration is my goal, so I’m happy to know that I’m succeeding in some measure!
I love your coconut eggs – they sound delicious – coconut and chocolate is a favourite combination for me – and it is wonderful to think you are bringing new life and audience to older recipes.
I find old recipes fascinating and frustrating so I think a modern revisit is just what I would love to see. Your approach to being a cookbook author is gutsy and strategic – sounds like a lot of work but headed where you want to go
Thank you, Johanna! I’m glad other cooks out there are as interested in old recipes as I am. And I like the words “gutsy and strategic.” They make me feel very bold and capable! I appreciate your encouragement.
Pingback: Chocolate Sandwich Cookies with Rice Crispie Ganache | The Lass In The Apron
Pingback: Apricot Souffle Cake | The Lass In The Apron
Pingback: Announcing Potato Pie and Cherry Pickle | The Lass In The Apron
Pingback: Tuscan Panforte Biscotti: A Christmas Inspiration | The Lass In The Apron
Pingback: Small Batch Coffee Company and Coffee-Cointreau Truffles | The Lass In The Apron
these are utterly genius! I remember making something similar as a child but covering them in yellow chocolate (whatever that is) and making them look like little chicks… so cute. I adore coconut so these are so me… and of course even though the egg contingency is low they are indeed eggs so they count! Thanks so much for the brilliant entry… and good luck with the cook book, it sounds so eggciting!
Thanks, Dom. It would be fun to try using the filling to create other shapes like chicks . . . or hearts for Valentine’s Day . . . or of course snowmen at Christmas, covered with white chocolate . . . oh, look at how you’ve got me started now!
Your cookbook sounds like something I definitely would be interested in – I love heritage, past down, classic recipes. Delicious little coconut easter eggs too!
Me, too! I’ve always thought food was the most interesting way to explore history, culture, and geography.
Pingback: Top 15 Delicious Easter Sweets and Treats | Food Hub
Pingback: Coconut Easter Eggs - fancy-edibles.com
I love coconut and chocolate – mmm homemade Bounty bars! These look adorable for Easter – thanks for linking them to #CookBlogShare
A pleasure, Lucy. Hope you had a wonderful Easter!
Pingback: Bacon, Onion & Basil Quiche #Bakeoftheweek - Casa Costello
A BIG well done and what a wonderful opportunity too! I am so pleased for you and thanks for this lovely entry into tea time treats too!
Thank you, Karen!
Pingback: April’s Tea Time Treats Chocolate Recipe Round-Up!
Pingback: April Biscuit Barrel Round-up | The Lass In The Apron